
All settings apply to the iPhone and iPad and refer to an already somewhat older software version. Newer software versions may behave slightly differently. In principle, however, everything is similar or even simpler with the newer systems.
The most common errors are incorrect port numbers or an unset password for sending emails.
Settings in iPhone – Step 1
First you call the settings:

There first click on:

…then click on:

…then click on:

…then click on:

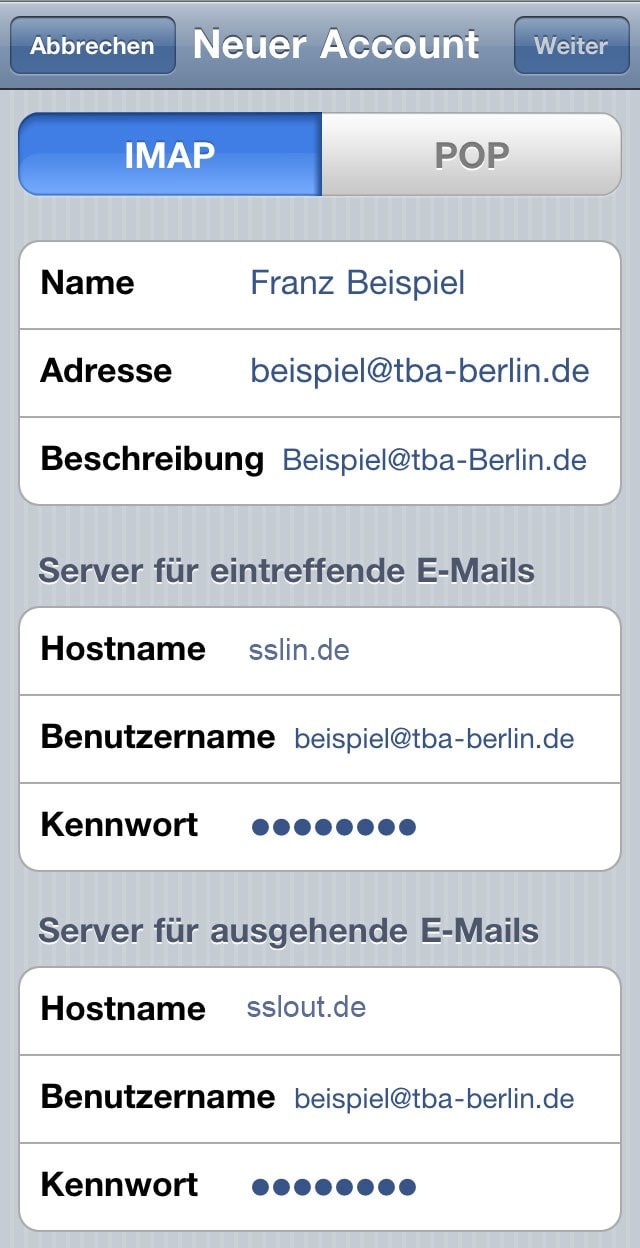
With this you can now enter a new account:
- The name is the one to be shown in an email along with the email address as the sender address.
- The address and password were given to you by TBA.
- For the description, take the email address.

After these settings, tap “Next”;
there is an initial check, then it goes to these settings:
- At the top of the iPhone window, the settings you have just made are shown once again.
- Over it you can switch between IMAP and POP connections, we want to set up an IMAP connection and choose IMAP.
- Below this, the server for incoming mails is to be entered:
- The hostname is sslin.com
- The username is the new email address
- Please retype the password after deleting the dots.
- Now the server for outgoing e-mails has to be entered:
- The hostname is sslout.com
- The username is again the new email address
- Please retype the password here as well after deleting the dots.
- Tap on “Next”.
Is there an error message?
Then please check the above settings with “Edit”. Often you mistyped the password; then delete the dots there and simply retype both passwords.
If no error message comes but everything went well, see this:
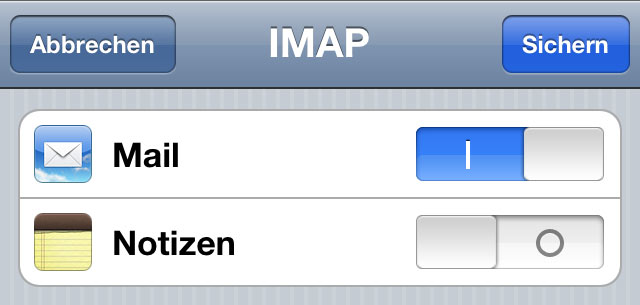
Everything went well, tap “Save”. The account will be added and displayed in the list of accounts now. But we are not finished yet.
Settings in iPhone – Step 2
Navigate to the advanced settings of the account:

…then click on:

… and at the bottom on:

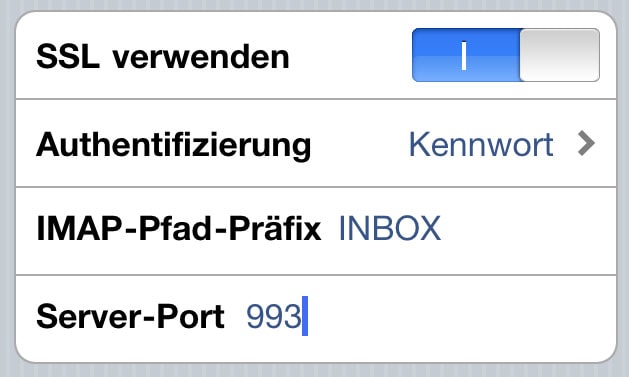
On the page that comes, scroll down!
The following settings must be exactly as in this picture, please check!
Often INBOX must be entered for the IMAP path prefix:
Save these settings: Go back the way you came: tap “Account”, then “Done”, then “Mail…”, then “Settings”. After that, close the settings by pressing the button below the screen.
Settings in iPhone – Step 3
Open Mail:
Mail recognizes the new account and retrieves it. We need this because Mail also uses it to look up what the folders (“Sent”, etc.) on the server are called.
Settings in iPhone – Step 4
Exit Mail and go back to the account settings:
…then click on:
… and at the bottom on:
Here we now map the folders we just found on the server to the mail account on the iPhone:
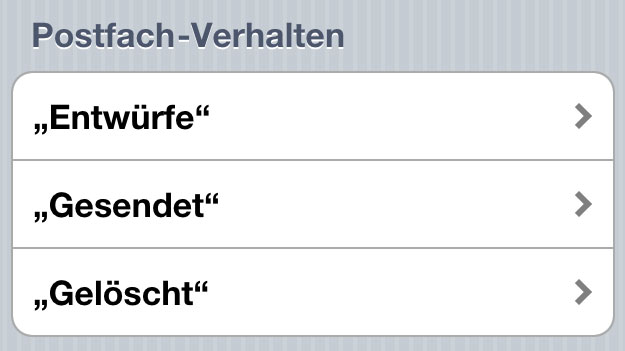
Click the folders one by one and reassign everything:
Our proposal is:
- “Drafts” -> On the server:“Draft“.
- “Sent” -> On the server:“Sent“.
- “Deleted” -> On my iPhone:“Trash“.
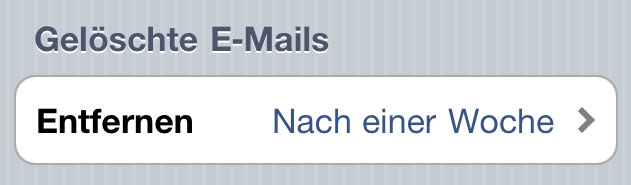
Now set how long deleted messages should remain on the iPhone (in case you accidentally delete something). We recommend 1 week:
Save these settings: Go back the way you came: tap “Account”, then “Done”, then “Mail…”, then “Settings”. After that, close the settings by pressing the button below the screen. Ready.
Settings in iPhone – Send test mail
It is best to go to Mail again. Send yourself there a test mail from the new account to the new account (sender and recipient are the same). With this you test if the sending and receiving works.
You should have a new mail in the Sent folder and a new one in the Inbox.
If you already have an email client set up on the MAC or PC (Apple Mail or Thunderbird) you can open it. There, too, you should find the email you just sent via the iPhone in the Sent folder and the Inbox.
Ready. Congratulations!
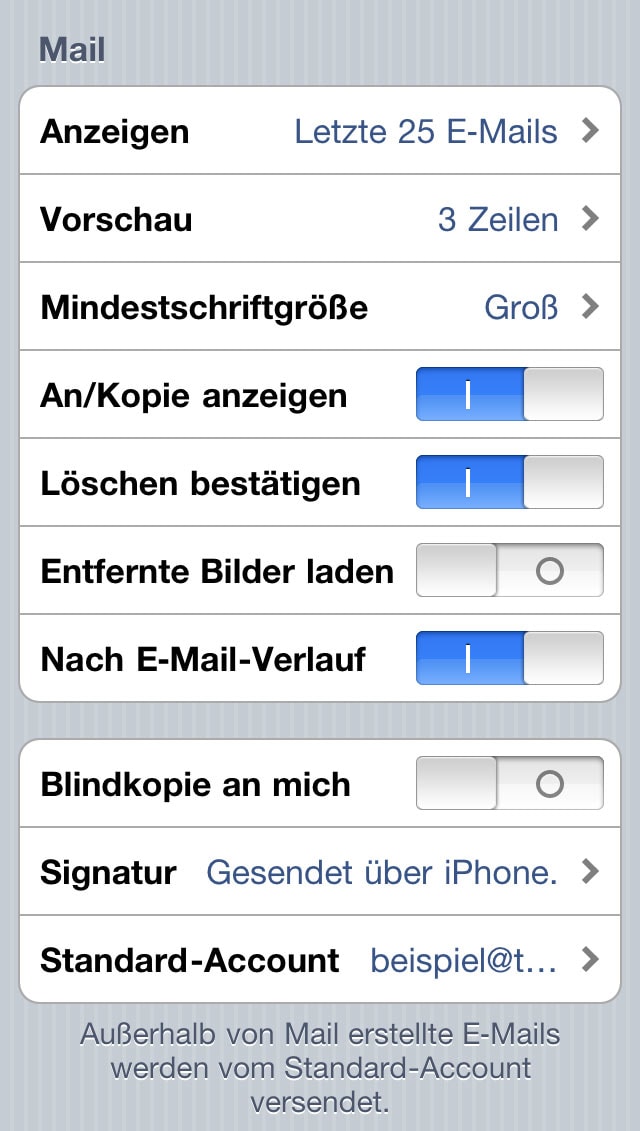
More preferences in Mail / Signature
After everything is set up, you can see our suggestions on how to set the preferences in Mail here: Go to the settings:
There first click on:
Then scroll down (under the accounts).
First set the data match to “PUSH” and then compare these settings:
- For spam protection, it is important to turn off “Load removed images” so as not to give the spammer any indication that the mail has been read.
- Then set the signature. As a company, you are legally obligated to include your address data and the other information in the e-mail, just as you would in a business letter.
- As default account you set which email account should be preselected for a new mail if you have created multiple email accounts.
That’s it.