
Apple Mail is a very good, easy to set up and easy to use email program that is already installed with the system software. It also has a built-in spam filter.
Our instructions are for an older version of Apple Mail – older and newer versions may differ slightly in appearance and functionality. Please let us know if you have any problems).
Apple Mail – Set up email account – Step 1
Open Apple Mail. It is usually already in the Dock when MacOS X is installed. When Mail is loaded, go to the preferences. You can find them in the menu under “Mail”:

Tip: Settings of applications are almost always found in this place with Apple applications: in the menu under the program name.
In the settings, select the “Accounts” tab:

At the bottom left you will see a plus sign, click it:

A window will open where you can enter the basic data for your new e-mail address:

Tip: The “full name” is displayed with every e-mail in addition to the e-mail address and can be freely selected, e.g. your name, “practice”, “secretary”….
Click on “Continue”.
Confirm the certificate warning that then appears with “Connect”.
A new window will appear.
- For Server type, enter: IMAP.
- For description take your email address.
- The server is“sslin.de” (without quotes).
- Username is again your email address and
- the password was given to you by TBA; enter it again
(overwrite the points!)

Check your details again carefully and then click “Continue”. Another window appears.
If errors are reported, click “Back” and correct your information. Often the server name is not correct.
Now we can move on.

- For description take again your e-mail address.
- The server is“sslout.de” (without quotes).
If Safari has automatically pasted something here, check it carefully;
mostly after that “.de” is even more, that must all be deleted”. - The username is again your email address and
- the password was given to you by TBA; enter it
(overwrite the points).
Then click on “Continue”.
If errors are reported, click “Back” and correct your information. Often the server name is not correct.
If successful, you will see a summary again. Remove the checkmark from “Bring account online” (this comes later):

Click on “Create”. With that almost done, your new account will appear at the bottom of the list on the left:
If the new account is selected (1x click on it), it can be revised with the settings on the right.
Apple Mail – Set up email account – Step 2
We will start with the account settings on the left tab, here you will see all account parameters summarized once again:

Insertion: You can see the SMTP parameters (e-mail sending server) if you click the selection list and stand on “Edit server list”. The assigned server is already selected there. Use the two tabs to scroll through the SMTP outgoing mail server preferences.

It is best to change this to “Use own port”: 465.
You can remember where these settings are: If, for example, you should change your e-mail password later on, you will have to enter it in this hidden place as well.
Apple Mail – Set up email account – Step 3
The remaining settings with our recommendations for first use:

The last tab “Advanced” is important: Check especially if the IMAP path prefix“INBOX” (without quotes) is entered and the port 993 is correct:

Tip: With the top two checkmarks, you can deactivate and reactivate an account at any time without deleting anything or losing any data. For example, if you are traveling, this allows you to suppress traffic for all mailboxes that have a lot of mail every day, but which you do not need to read while traveling. This saves you loading times and data transfer fees, which can be very high abroad, as we all know (roaming).
Apple Mail – Map Server Folder
Now you need to tell Apple Mail which folders to use on the server instead of the local folders for “Sent”, “Trash” and “Drafts”.
Retrieve new mails with Mail. This will also fetch the information from the server of the new mailbox, what folders are online and what they are called. You will then see the following on the bottom left under the “Local” section:

Mark each of these folders by clicking on it and assign it by selecting “Mailbox” in the menu at the top, then select “Use this mailbox for” and choose the appropriate folder.

With this, the folders down there should gradually disappear. The contents of these folders are now properly located at Mailboxes:

If you want to see the folders, click the folding triangles.
Apple Mail – Set up email add-ons
Click on “New e-mail”:

A window will open. We want to configure this first. Click on the Extras icon.![]()
Click on “Customize” and make the settings (checkmarks) as you see them here:

Then click on “OK”. This gives you a blind copy field and allows you to change signature and priorities.
Tip: What the blind copy entry is so important for, you can find out here.
Apple Mail – Send test mail
If the window for a new e-mail is not yet open, click “New e-mail”:
Now it is best to send a test mail from the new account back to the new account (sender and recipient with the same email) to test successful sending and receiving at the same time. Please enter the recipient email (take the email of the new account) and click on “Send”.

A new mail should now appear in both the Sent folder and the Inbox. – Congratulations!
Apple Mail – Set signature
As a company, you are legally obligated to include your address data and the other information in the e-mail, just as you would in a business letter. Go to the program settings. You now know how to do this (in the menu under the program name “Mail” click on “Settings”). In the window that opens, click on the “Signatures” tab.

1. click on the new account in the lower left corner and select it.
Click on the plus sign at the bottom: A new entry appears above it.

Replace the word “Signature…” with a meaningful name, e.g. “Fritz Example” in our example.
Replace the text that Apple has created on the right by default with your desired signature text. Ready.
5. at the bottom it says “Select signature” for the clicked account and behind it either “Without” or the new signature. If it says “Without”, select the new signature. (Make sure that the associated email account on the left is still selected so that the mapping works).
The easiest way to test the new signature is to write a new email to yourself. You should now see the signature in this email.
Apple Mail / Advertising Filter – How it works
The advertising filter is the built-in filter against spam mails.
“Advertising”, “junk” and “spam” mean the same thing and refer to unsolicited commercial and virus emails that you often receive in bulk unsolicited and that clutter up your inbox.
First of all, please read some information about how this spam filter works in order to use it in the best way: The Spam Filter Principle.
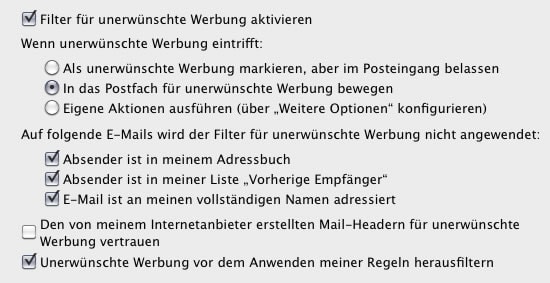
Apple Mail / Advertising Filter – Setup
Now let’s move from theory to practice: go to the program settings. (in the menu under the program name “Mail” click on “Settings”). In the window that opens, click on the “Advertising” tab.

Here is an example of how you could set the filter:
Please confirm this with “Move”:

The filter starts working and puts all advertisements it finds in the future into the newly created local “Advertising” mailbox.

Now go to the “Accounts” tab in Mail’s settings and click on each account and look on the right under the “Mailbox behavior” tab to see if the settings for advertising are as desired:

Ready.
Now use the filter as described in The Spam Filter Principle.