
An example of a WINDOWS program. Thunderbird is a good free email program from the creators of the browser “Firefox”. It is versatile and provides a very useful spam filter against annoying advertising mails right away.
Our instructions are for an older version of Thunderbird – newer versions may differ slightly in appearance and functionality. Please let us know if you have any problems).
Install Thunderbird
If you have not yet installed Thunderbird, please do so now: www.thunderbird-mail.de
Thunderbird – Set up email account – Step 1
Let’s continue now with the creation of a new IMAP email account.
Please follow the order of settings shown and do not skip anything. In case of doubt, please ask us by phone. But everything is simpler than it first appears. You will see it.
First enter your name, email address and password. Select “Save password” if you trust the users of your computer, then you will not need to enter it every time.

Click on “next” and then see this:

Please wait until the two green dots ![]()
![]() are visible. This is a good sign that Thunderbird was able to connect to the name and password and download the correct settings from the TBA server.
are visible. This is a good sign that Thunderbird was able to connect to the name and password and download the correct settings from the TBA server.
After that, DO NOT click on “Create account”, but check that “IMAP” is selected at the top and then click on “Custom settings” at the bottom.
There, click on “Server Settings” on the left and then on “Advanced” in the right dialog box: a new window will open.
Enter the word “INBOX” at the top of the “…directory” (in capital letters and without quotation marks) – see figure:
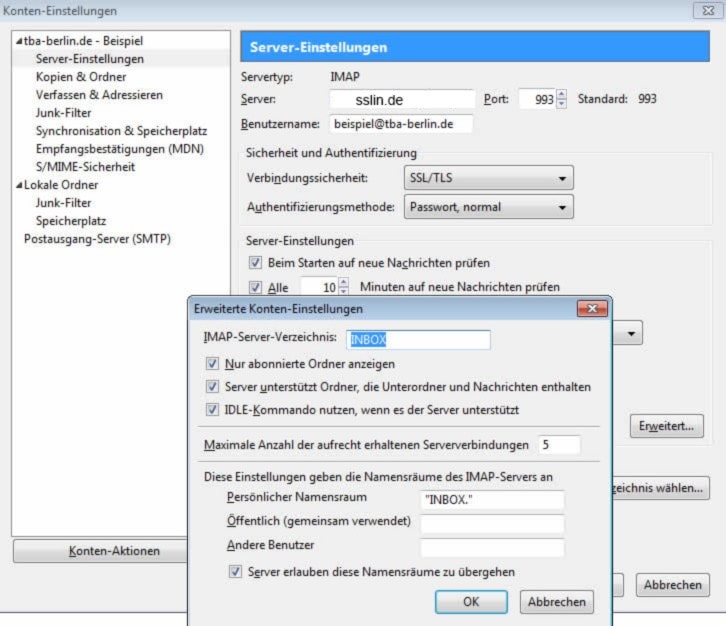
Please compare if everything is as you see it here.
Then click “OK” to close the pop-up window.
Then exit the settings with “OK” and create the account.
Thunderbird – Set up email account – Step 2
Please exit the program briefly and restart it:
On the left, there are now usually 4 subfolders displayed (you may want to click the black triangle to the left of the mailbox name to expand it to see them):

Additional info: Don’t let it bother you if you see 2 wastebaskets. The first one (blue) is the Recycle Bin stored locally on your computer, the bottom one (yellow) is the Recycle Bin folder on the server (all folders on the server are yellow).
Don’t you see those yellow folders? …then something went wrong with the previous installation steps, otherwise continue reading at step 3.
You can then try clicking on “Subscribe to IMAP folder” (see image below where you have to click) and then click on “update” in the new window:

The three folders Draft, Sent and Trash should have a check mark.
If the folders are still not displayed, this is the indication of a deeper problem. Maybe username and password are not correct. You can test this by writing yourself a test email (recipient AND sender are your new email address, see here).
Click on the email account (email address in bold) in the column on the left:
On the page to the right, you will now see, among other things, an input button “Edit account settings”. Click there to open the account settings again.
Now please select “Server settings” on the left and then set the recycle bin in the right area as shown in the picture:

If several recycle bins are displayed, don’t take the pretty gray-blue one, but the one with the yellow folder: that’s the recycle bin on the server we are looking for.
Thunderbird – Set up email account – Step 3
Now select the “Copies & Folders” section on the left; we will now set important folders: First we assign the correct “Sent” folder, the one on the server. In the right area please check the box “Save a copy as”. Then please select “Other Folder” just below it and click the popup selection to the right of it, select the email account and click “Sent” there.

If “Sent” appears several times, don’t take the pretty blue one, but the entry with the yellow folder, that’s the draft folder on the server we’re looking for.
Thunderbird – Set up email account – Step 4
Please now go below to “Save drafts as” and link “Drafts” to the yellow (online) folder “Draft” as shown here:

At “Archive” and “Templates” please select “Local Folders”.
Everything must look like this afterwards (please compare):

Click “OK” on the account settings to exit the settings and update the new account.
Exit the program and restart it. You may now see 2 different trash cans on the lower left of the email address. You can safely delete the yellow one with the name “Trash”. Click to select and then click the right mouse button and click “delete” in the selection menu. It may happen that “Trash” appears again as a subfolder of “Recycle Bin”: Select it again, press the right mouse button and select “Delete” again.
Ready!
Thunderbird – test e-mail functions
Now it is best to send a test mail of the new account to the new account (sender and recipient with the same e-mail) to test the successful sending and receiving at the same time.
Click on the e-mail in the list on the left, then click on the “Compose” button at the top, the following window will open:

Please enter the recipient email (take the email of the new account) and click on “Send”.
A new mail should now appear in both the Sent folder and the Inbox. – Congratulations!
If there are 2 “Sent” folders after sending, now we need to clean up a bit:
Please go to the account settings (click on it and click “Edit account settings” on the right, as described above).
Repeat the selection process described in chapter“Thunderbird – Email account setup – Step”.
After that, the bottom “Sent” folder on the left is blue and the one on the top is yellow. Click on the yellow Sent folder at the top. If there is no important message there, but only our test from just now stored (check it on the right), then click “delete” with the right mouse button.
Now everything should be right.
Thunderbird – Set signature
As a company, you are legally obligated to include your address data and the other information in the e-mail, just as you would in a business letter. Go to the account settings. You now know how to do this: click on the account in the column on the left (email address in bold): on the page on the right you will now see, among other things, an input button “Edit account settings”. Click there to open the settings. Click there again on the email account name, now you can enter a signature in the right area, see example.

The easiest way to test the new signature is to write a new email to yourself. You should now see the signature in this email.
Thunderbird Junk Filter (Anti-Spam) – How it works
The Junk Filter is the built-in filter against spam mails.
“Junk” and “spam” mean the same thing and refer to unsolicited advertising and virus emails that you often receive in masses unsolicited and that clutter up your inbox.
First of all, please read some information about how this spam filter works in order to use it in the best way: Spam Filter Principle.
Thunderbird Junk Filter (Anti-Spam) – Setup
Now we move from theory to practice: having just read how the filter works, now go to the account settings (click on the account in the column on the left, then click on the “Edit account settings” input button on the right side of the page). There you go to the selection “Junk Filter”, you set this as shown in the figure:

Create the “Junk” folder in the “Local folder” (see the picture).
You could also create the “Junk” folder on the server, then you could also make the found spam available to other email programs. However, it is then more difficult to train the spam filter; therefore, we do not recommend this for beginners at first.
Deletion is set to 14 days, until then you should check the junk occasionally to see if there are any accidentally “good” mails among them and be sure to mark them with “no junk” (see next section).
Thunderbird Junk Filter (Anti-Spam Filter) – Application
 Click the “Junk” button in the message bar to mark it as spam; the message will be marked and moved to the local “Junk” folder. The spam filter usually does this automatically later.
 If you (or the automatic filter) have marked a message as “junk” although it is not, you should undo this in 2 steps:
- First click “No Junk” in the message and then click
- move the message back to the Inbox folder.